ACF Blocks
Adding a custom ACF block via your Twig template
Go to “Twig Templates > Add New” to add a new Twig template. Make sure to open the screen options pulldown in the top-right corner of the edit screen, and make sure to place a check-mark with the slug Screen element.
Now give your Twig template a meaningful Title and – even more important – a unique but meaningful slug. This will become the block identifier, which means that once you start adding the block to layouts it will be tied to this identifier. Changing it later will result in losing the connection.
The next step is adding the headers for the block. This tells Gutenberg some essential things about the block, like the Title and Category. For Toolbox it is also important and needed to add a setting called TemplateType.
{#
  Title: Customer Testimonial
  Category: text
  TemplateType: block
#}
The settings in the snippet above are the bare minimum for a block registered by Toolbox. There are a few more settings, a few of which you can see in the example below.
Adding the fields
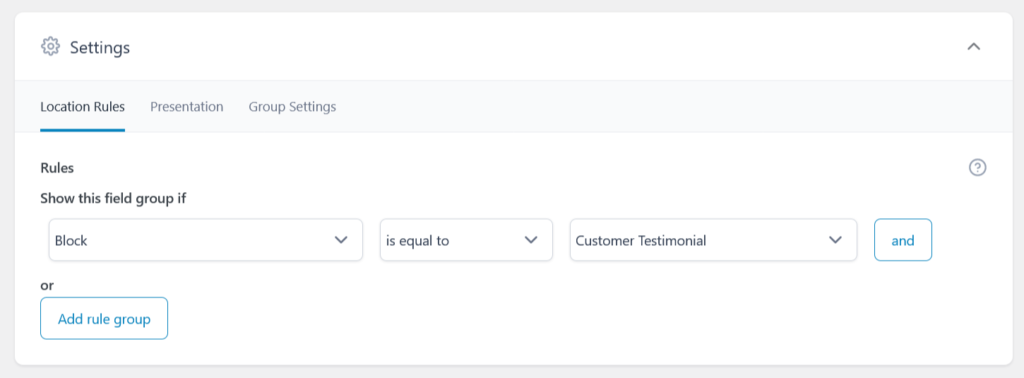
As soon as you publish or update this template, you will be able to find it as a registered block within ACF fieldgroup’s Location Rules.
Any field added to the block instance will be available to the Twig template for usage, so when we add a repeater field with a few subfields the block has access to it. Because we use Timber, make sure to set the return format to “Image ID” for the Author Image subfield. The other return formats also work of course, but Timber provides a very pretty easy way to get exactly what you need.
With these fields, and the use of the UIkit CSS framework (included with Toolbox, see this article on activation) we can generate the following template to render our testimonial cards:
{#
  Title: Customer Testimonial
  Category: media
  TemplateType: block
  Description: Customer testimonial
  Icon: admin-comments
  Keywords: testimonial quote "customer testimonial"
  Mode: edit
  Align: none
  PostTypes: page post
  SupportsAlign: none left right
  SupportsMode: true
  SupportsMultiple: false
#}
 data-{{ block.id }} class="uk-child-width-1-3@s uk-grid-match uk-flex-center" uk-grid>
	{% for card in fields.testimonials %}

        	 class="uk-card uk-card-default uk-card-body uk-relative uk-flex uk-flex-column uk-flex-stretch">
            	{% if card.author_image %}
                	 class="uk-margin-small uk-text-center">
                		 data-src="{{ TimberImage( card.author_image ).src( 'thumbnail' ) }}" class="uk-border-circle" width="100" height="auto" uk-img>

                {% endif %}
                 class="testimonial uk-flex-1">
            	{{ card.testimonial }}
