Use Timber to create ACF Blocks
Code
Update
As of Toolbox version 1.3.0 the ACF Timber Blocks library has been included in the plugin. If you have both Timber Library plugin and ACF Pro installed you can add ACF Blocks right from your WP Dashboard.
See this article to learn more.
Timber is a very easy and convenient way to add PHP to your site. Toolbox can be used to leverage the Timber Library plugin and Twig templates to generate code very fast, using the Timber Posts Module in Beaver Builder or to execute templates using the toolboxtwig shortcode (see this article).
But you can also add a 3rd party file to use Twig templates to register Gutenberg Blocks and add ACF fields to them to control the output. In this article, we will see how this can be achieved.
Requirements
You will need to install the following plugins on your site:
- Timber Library plugin
- Advanced Custom Fields Pro plugin (ACF Blocks is only part of ACF Pro)
- Easy UIkit (Not required, but very easy to create layouts and IS used in this examples code)
- Timber ACF WP Blocks A library that will register ACF blocks based on twig template-file headers.
Follow the instructions below to install it manually.
Installing Manually
The docs for Timber ACF WP Blocks describe how you can install it using Composer. If you’re not sure what Composer is, it is very unlikely that you have it installed on your machine. You don’t need it to add the library though, because thankfully it consists of just one file. Here are the steps to copy and add the that file manually.
Step 1
Open up this url in your browser.
Step 2
Copy the entire content of the file to your computer’s clipboard
Step 3
Create a new folder called “src” in your theme’s root-folder and create a new file called “timber-acf-wp-blocks.php”. Copy the content of the clipboard into that file and save it.
Step 4
Create a directory called “views” in your theme’s root-folder, and a directory into that which is called “blocks”.
Step 5
Open up your theme’s “functions.php” and add the following line of code:
require_once( 'src/timber-acf-wp-blocks.php' );You are now ready to add blocks!
Adding your first block
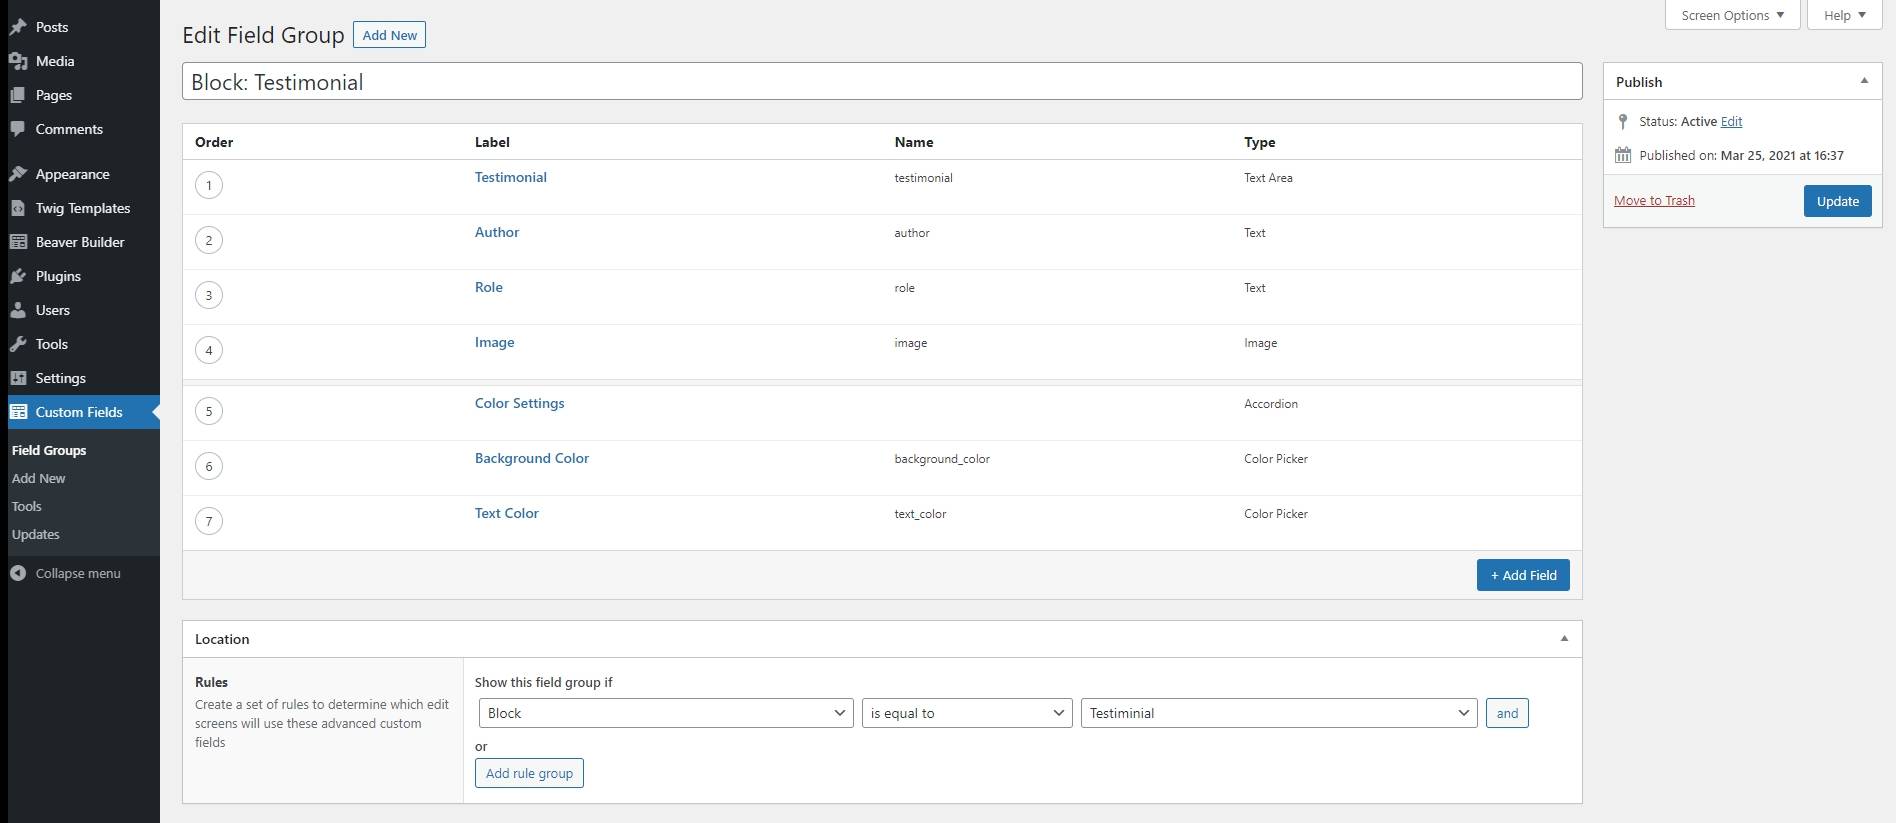
For this example, we will be recreating the block featured on the Advanced Custom Field Docs page that you can find here.
Adding blocks that use ACF fields for controls is a two step process. First, you will need to create a Twig template in the directory “blocks” that you created in step 4. We will do so by adding a file called ‘testimonial.twig’. Add the following Twig template into that file and save it.
{#
  Title: Testiminial
  Description: A Custom testimonial block
  Category: formatting
  Icon:
  Keywords: A block with gist code
  Mode: auto
  Align: center
  PostTypes: page post
  EnqueueStyle: ../bb-theme-child/views/blocks/testimonial.css
  EnqueueScript: https://kit.fontawesome.com/1dc16f7d6b.js
  SupportsAlign: left right center wide full
  SupportsMode: true
  SupportsMultiple: true
#}
 id="testimonial-{{block.id}}" class="{{block.classes}}{{block.align ? " #{block.align}"}}">
     class="uk-grid-collapse" uk-grid>
         class="testimonial-blockquote uk-width-2-3@s uk-padding">
class="testimonial-text">{{fields.testimonial}} You can also create the CSS file that will add some additional styling to the block. Name the file “testimonial.css” and put it in the same directory as the twig template.
div[id*="testimonial-"] {
    border-radius: 30px;
}

div[id*="testimonial-"] .testimonial-text {
    font-size: 3em;
}
div[id*="testimonial-"] .testimonial-text:before {
    content: '\f075';
    font-family: "Font Awesome 5 Free";
    margin-right: 20px;
}

div[id*="testimonial-"] .testimonial-image {
    border-top-right-radius: 30px;
    border-bottom-right-radius: 30px;
}
Adding the Custom Fields
If you’ve saved the Twig template to the ‘views/blocks/’ directory in your (child-)theme AND have enqueued the “timber-acf-wp-blocks.php” file correctly in your functions.php you should see the block listed when you create a new fieldgroup.
When using Timber, setting the return value for an image field to ID is usually the smartest move. You can use a function called TimberImage in the template to get the information that you need later if necessary.
Adding the block to your page
After having added the code, the template and the fieldgroup, you should now be ready to add the block to your page or post!


Beaverplugins
Web ninja with PHP/CSS/JS and Wordpress skills. Also stand-in server administrator, father of four kids and husband to a beautiful wife.Always spends too much time figuring out ways to do simple things even quicker. So that you can benefit.