When I had finished the first release of Toolbox I needed to add a Docs section to the website, in which I could easily navigate through the different sections and subpages. My first thoughts were to download a plugin from the WP Repo so I downloaded and tried a few but, although they all worked fine they didn’t allow me to use either the links to articles or the layout the way I wanted them. That’s when I decided to use Toolbox to build my own Docs pages, and here’s how I did that.
Step 1: Creating a Custom Post Type (CPT)
To be able to keep things seperate from pages and posts on the website I created a CPT called “docs” (Post Type Slug) using the CPTUI plugin. You can use any other means of adding a CPT, just make sure it has “hierarchical” set to true. Make sure to set an appropriate slug because that will be visible as a part of the url when articles are clicked.

Also make sure that the CPT supports Revisions, Author and Page Attributes so you will be able to set the Menu Order. Here are my settings for this CPT:
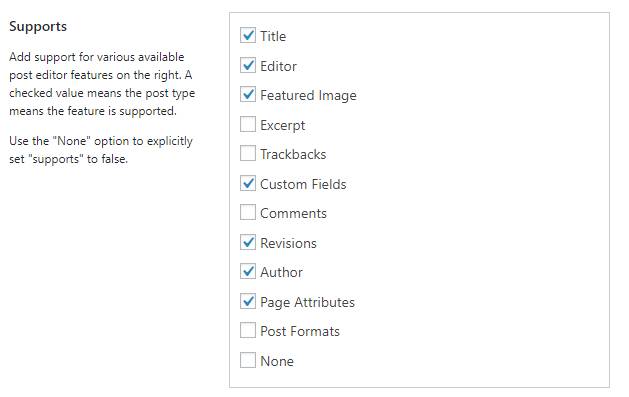
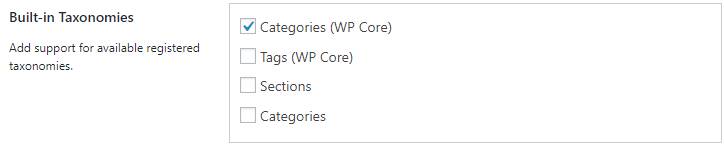
I also included the Categories (WP Core) Taxonomy as a built in Taxonomy. Notice I didn’t included the taxonomy “section” (that we will create in step 2). This is because I don’t want it to appear in the sidebar, but rather in the post. the reason why will become more clear in step 3.
Step 2: Adding a Taxonomy to the CPT
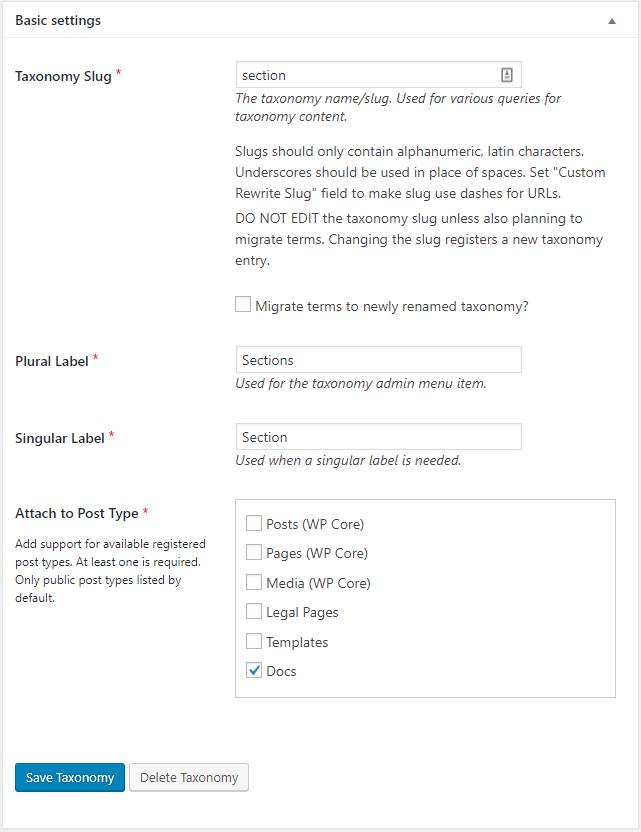 There are probably a number of ways to do this. You can use CPTUI plugin to add a Taxonomy, I named mine “section” (Taxonomy Slug), and added it to the “Docs” CPT.
Step 3: Adding a ACF Field Group to select the ‘section’ Taxonomy
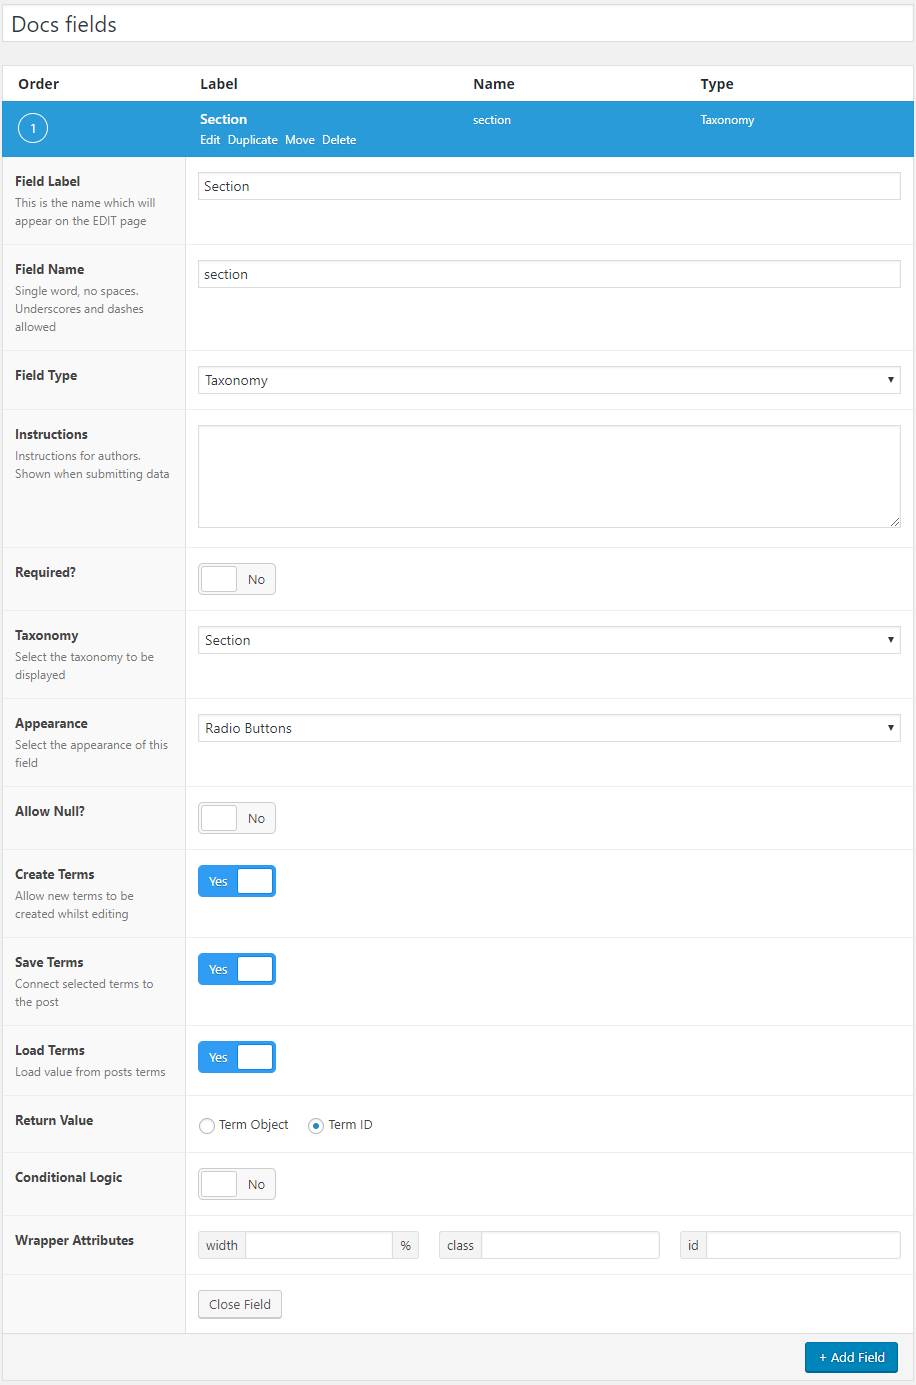 There likely is also more than one way to add the taxonomy to the post, I just liked to add them using ACF for this CPT. The ACF Taxonomy type allows you to set the appearance of Radio Buttons, so that I can only select one section for a certain Docs post. Make sure to add the Fieldgroup to the CPT called ‘Docs’ we created in step 1.
Step 4: Adding the content
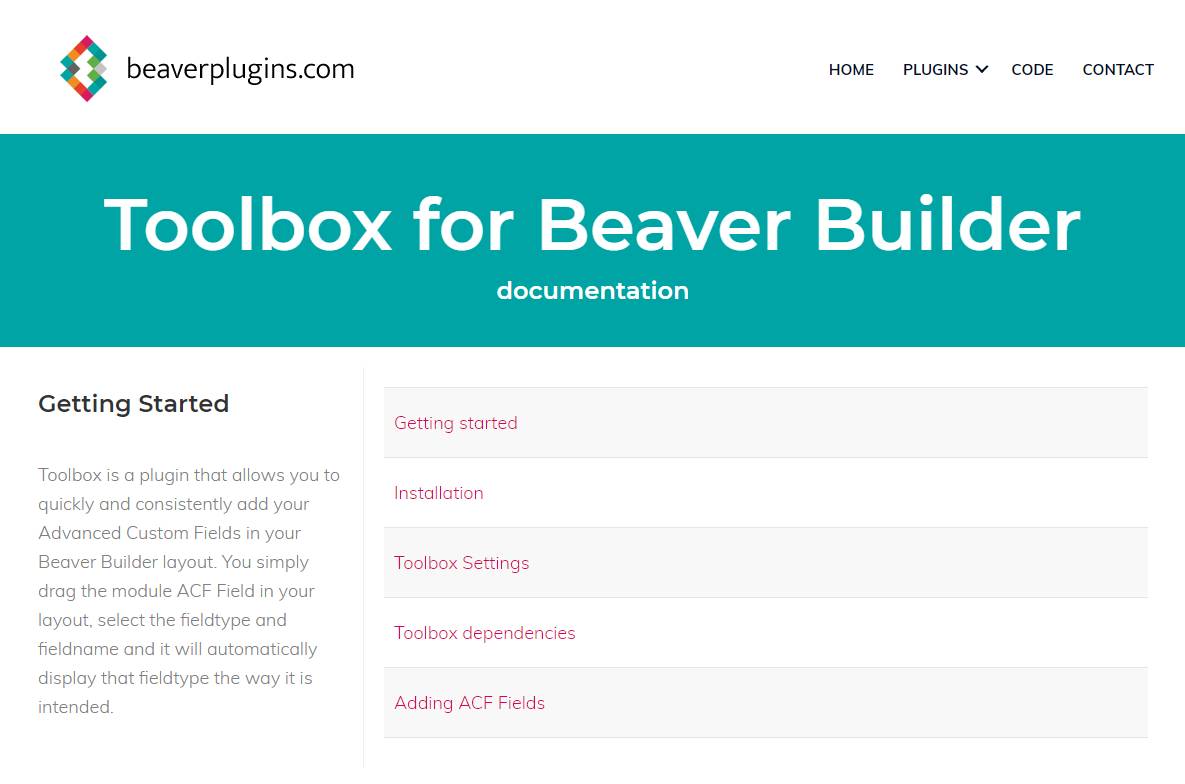 The way I have set it up is fairly simple: The top level for the CPT is the name and index for the content. This(see picture to the right) is what the docs looked like at the time of writing this.
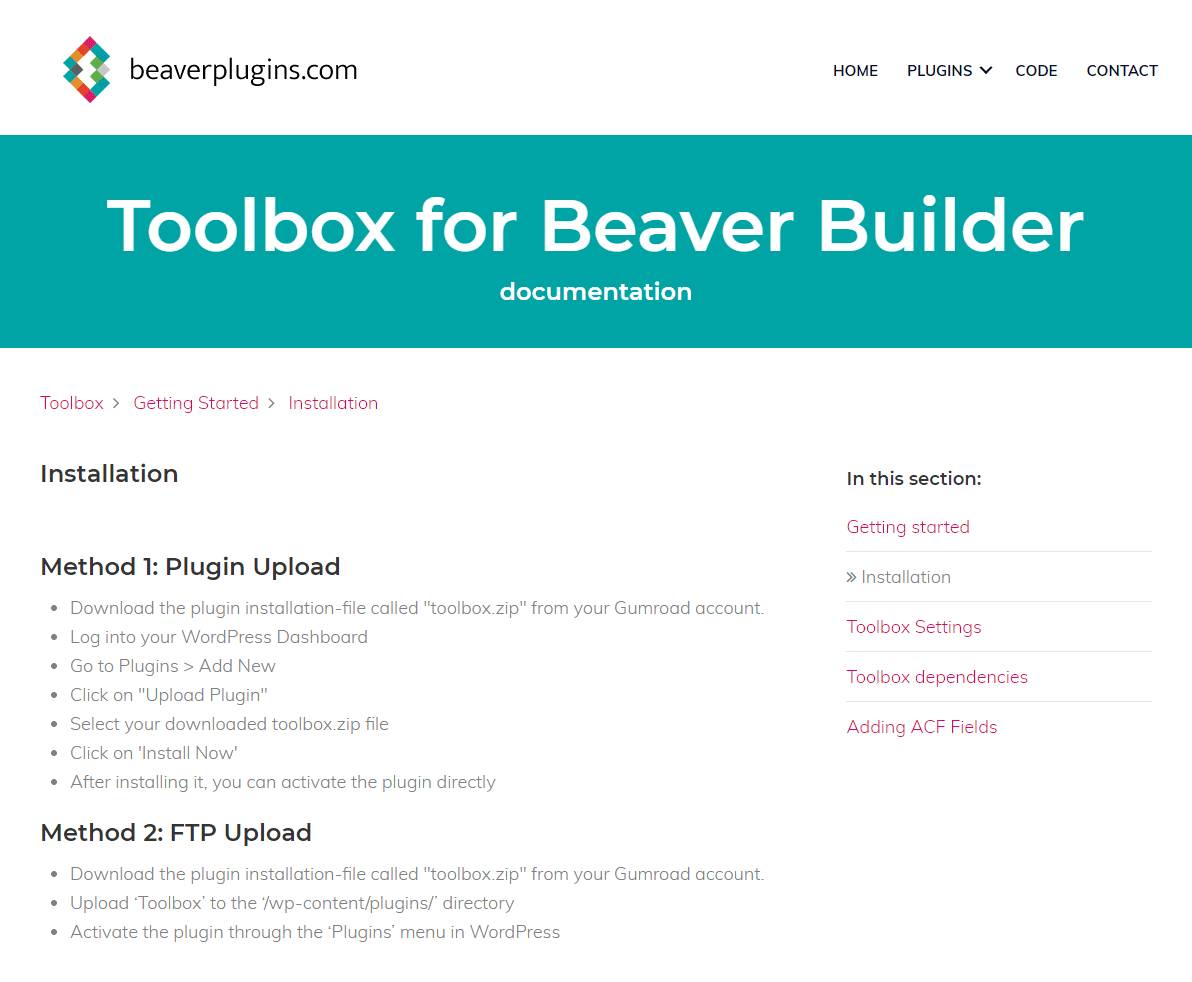
As you can see, the first page shows an overview of the pages in each section, in this screenshot it’s the “Getting Started” section. So, let’s first start by adding a few posts in the Docs CPT, making sure to set the category-taxonomy and section-taxonomy before saving them. Also set the Menu-order value if there is a certain ordering in which you want articles to appear.
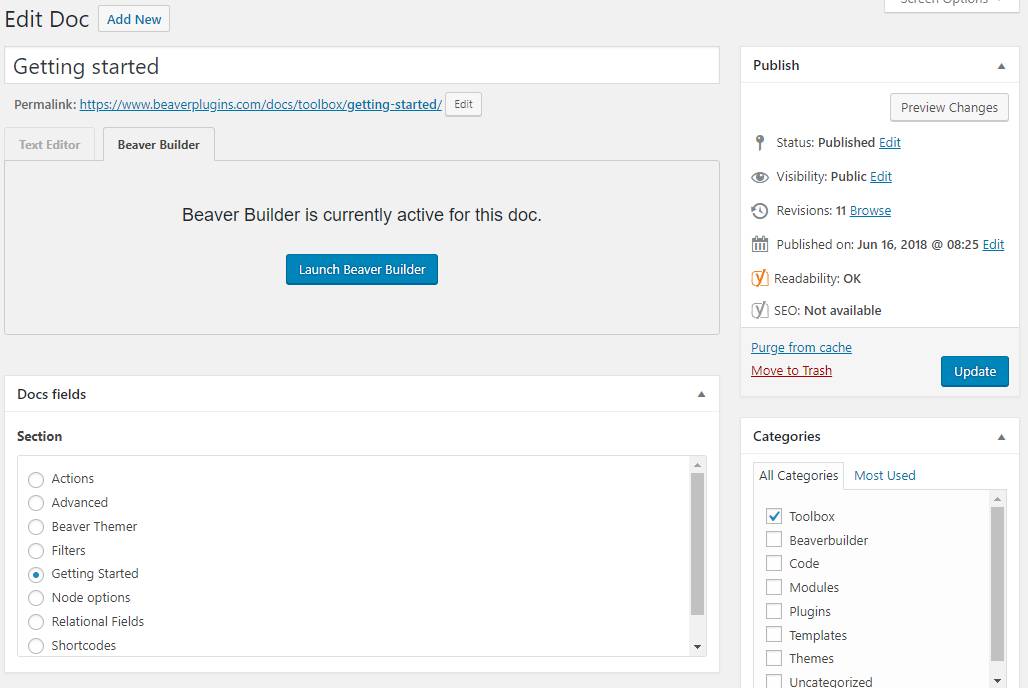 Here you can see the settings on the “Getting Started” article. By having added the Taxonomy as a radio button I have made sure I can only select one section. If you have more Docs (different products) then it may be easier to also add a term for the Category. Here I have added the term “Toolbox” so that later on I can select to show articles on both the Category-term “Toolbox” and a certain section-term.
 After adding several articles, on each setting their section and category/categories, you will have have something to work with for step 5.
Step 5: Creating the Product Page/Post and setting the ‘Content’ tab.
So, the topmost post in the previous image has a title “Toolbox” and is going to be the index for the entire Toolbox-docs. What you want, of course, is that when you add an article for a certain section, it is automatically added to your index. With Toolbox you can simply display those articles. Open up your Beaver Builder Page Builder and add the first row, 2 columns.
The left column is just what it looks like, a simple Heading Module and Text Editor Module in the left column that have been entered manually. Although you most certainly could also add to, and retrieve fields from a fieldgroup added to the Taxonomy, I only need it on this page so it made sense to only have it as text here.
 The part that is really of interest is the right column of that (and each following) row. Drag a Timber Posts Module into the right column.
First, let’s adjust the content for this Module. Change the WP Query selectbox to “Custom Query”, because we are going to want to get the section from the Docs CPT. Make sure to set the Post Type to match the one you want to query. Also set ordering to “Menu Order”, Posts per page to a high enough number (or -1 for as many as possible) and Do Tax Query to “YES” to set the extra Tax Query parameters.
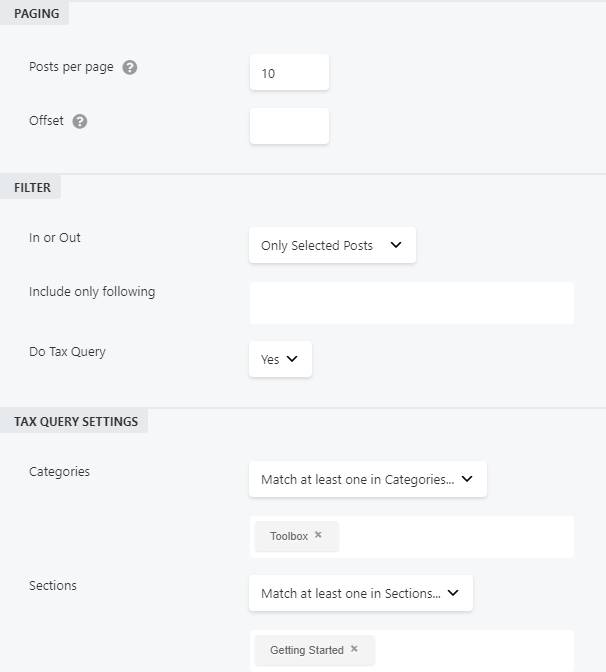 The Tax Query Settings are where we will need to pinpoint the articles we have added earlier.
If you have added a Category-term that applies to all articles for this product, you should select it here. Remember that you can use it for extra granular control so it is not needed if you have only one product.
Next, select the Section-term that you want to display. Here we want to show the “Getting Started” section so that’s what is selected in the screenshot.
Now let’s head over to the Template Tab of that Timber Posts Module.
Step 6: The Timber Posts ‘Template’ Tab
Now that we’ve set which posts to return, let’s head over to this Module’s Template. You will need to alter the default template, that is only a placeholder, with the following one:
{% for item in posts %}
-
{{wrapincode?"
"}}{{item.title}}{{wrapincode?""}}
{% if date(item.modified_date) > date('-2days') %}
updated
{% endif %}
{% endfor %}
The Timber Posts Module Queries the content with our set parameters. It returns the results into the posts variable for us to use, where Timber does some more magic that we can use.
On this website I use UIKit to format my layouts. The classes you see used in the template are easily read so you can still figure out what is happening.
This template is a layout, where each post creates an item, containing the title. If the item’s modified_date is less than two days ago, it appends an “updated” label to it, so visitors can see it has recently been updated. You might have seen the wrapincode variable. This is something we will look into at the end of this article.
Moving the Template out of the Module
After working with these kind of templates a while you will find that they are very flexible and can be made reusable. The way Toolbox has been set up is so that you can benefit from this as much as possible.
This page will have multiple modules with each displaying a certain section. You can duplicate the modules to prevent having to enter the template over and over again, but when you need to change something in that template later on and it is used on multiple modules you will still need to edit them one by one. Luckily there’s a solution for that.
With Twig you can include or import another twig. This means that we can import a (set of) macro(s) on this template to use, which we can change in the backend when we need to make changes. The only downside is, is that the changes will not be visible ‘in the builder’ but only on update. So let’s go and do that!
Make sure to copy what you’ve done so far to your clipboard and save the post.
Create a Twig Template
When you’ve installed and activated the Timber-library plugin and have enabled the Twig Templates CPT in the Toolbox Settings, you will have a Twig Templates CPT visible in your Dashboard. Select “Add New” to add a new Twig Template.
Enter a title “Docs Macros” and copy the code below or your clipboard copy to the twig template.
{% macro pluginsections( posts , wrapincode ) %}
{% for item in posts %}
-
{{wrapincode?"
"}}{{item.title}}{{wrapincode?""}}
{% if date(item.modified_date) > date('-2days') %}
updated
{% endif %}
{% endfor %}
{% endmacro %}Save the template and make sure the slug is called “docs-macros” (you might need to activate the slug in the ‘screen options’ in the top-right of your dashboard).
If you compare both templates you will notice that the original template has been wrapped in a macro – endmacro, which takes 2 parameters. Macro’s are like pieces of reuasable code, but exist in their own scope, which means if you want to use anything from the one calling it, you need to pass it in.
Loading the Twig Template for the module
Now, let’s head back to the post we were editing earlier. Open up that Timber Posts Module again en go to the ‘Template’ Tab.
Replace the template with a new template:
{% import 'docs-macros.twig' as mydocs %}
{{ mydocs.pluginsections( posts ) }}
And that’s it! the macros inside the “Docs macros” template are imported into a variable called mydocs and can be called using the macro name. The parameters are optional, and omitting to pass in a value for it will make it have a value of false, which in this case is exactly what we want.
Step 7: Creating the Article posts
 For these docs I decided to go with Full-Page Beaver Builder Posts, which allows me to style the layout whatever way I need. If you go this route you can’t really use a Themer Layout. It would be wiser to do so, but then you won’t be able to use Modules to layout your actual article.
The page is divided into three section:
- The breadcrumbs (Timber Posts Module)
- In this section ‘sidebar’ (Timber Posts Module)
- The actual article
Adding the Breadcrumbs
Let’s add the macro to the twig template first. Head over to the “Docs macros” Twig Template and add the following macro to the bottom of the template:
{% macro breadcrumbs( post ) %}
{% set ancestors = function('get_post_ancestors', post.ID ) %}
{% set ancpermalink = function('get_permalink' , ancestors|first) %}
{% set seperator = '    ' %}
{% for item in ancestors %}
	{{function('get_the_title', item )}}{{seperator}}
{% endfor %}
    {% for term in post.terms %}{{term.taxonomy == 'section'?term.name}}{% endfor%}{{seperator}}
    {{post.title}}
{% endmacro %}
This macro takes post as a parameter. Timber Posts Modules also take a parameter post which, when applicable will represent the current post that is loaded. In this case, this will be the article post.
When you have saved the added macro to the template, head over to the layout and add a Timber Posts Module to the top row.
You don’t need to change anything on the ‘Content’ Tab. Head on over to the Template tab and add the following template, which is a lot like the one we did a few steps back, but this time passing in the variable post into the macro:
{% import 'docs-macros.twig' as mydocs %}
{{ mydocs.breadcrumbs( post ) }}
Make sure to save this module as a GLOBAL module. This way you can reuse the same module in multiple articles while having the ability to at least control this module’s output.
Adding the “In this section” sidebar
This part is probably the most complex part, although it is actually very little code. What we want for this part, is to display a listing of the articles that belong in the same taxonomy-section, the ones that share the same term. The displaying article already has that term applied so we can get that one from the post. But we will need a way to pass that term-id to the Timber Posts Module. For that, we will have to add a callback to the functions.php.
Add the following function to the bottom of your active themes functions.php
function same_section_filter($args) {
	$args['tax_query'] = array(           //(array) - use taxonomy parameters (available with Version 3.1).
    'relation' => 'AND',                      //(string) - Possible values are 'AND' or 'OR' and is the equivalent of running a JOIN for each taxonomy
      array(
        'taxonomy' => 'section',              //(string) - Taxonomy.
        'field' => 'id',                      //(string) - Select taxonomy term by ('id' or 'slug')
        'terms' =>  wp_get_post_terms( get_the_ID(), 'section', array('fields' => 'ids') ) ,    //(int/string/array) - Taxonomy term(s).
        'include_children' => true,           //(bool) - Whether or not to include children for hierarchical taxonomies. Defaults to true.
        'operator' => 'IN'                    //(string) - Operator to test. Possible values are 'IN', 'NOT IN', 'AND'.
      ));

return $args;
}
Make sure you have added and updated your function.php with the code.
This callback returns an array that can be merged with the Timber Posts Module’s Content settings, retrieving only the articles that have the term we need, specifically the term the displaying article is also applied to.
For the template, we will need to add the macro to the Twig Template first. Open up the “Docs macros” Twig Template again and add these lines of code to the bottom of it:
{% macro samesection( posts ) %}
In this section:
{% for item in posts %}
{% if item.ID == post.ID %}
- {{item.title}}
{% else %}
- {{item.title}}
{% endif %}
{% endfor %}
{% endmacro %} Next, add a Timber Posts Module as the sidebar for this article. Again, make sure to select to use a Custom Query, Post Type “Docs” with an Order By set to “Menu Order”.
Now scroll down to the very bottom of the Content settings. Here you will find a field called “Posts Q-Args Callback”. You can add a “Posts Query Arguments Callback” here that will be merged with the existing settings.
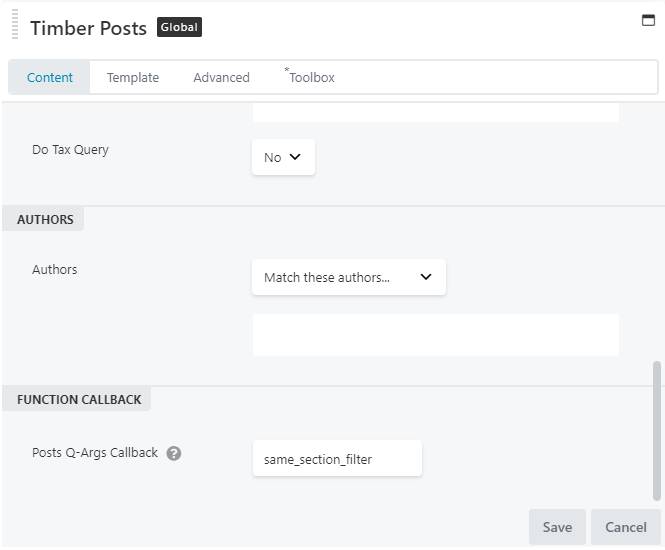
After adding all settings into the ‘Content’ Tab, go to the ‘Template’ Tab. Now, just last last time, Import the file and add the macro, this time again passing in the posts variable because we are expecting at least one or more posts to display:
{% import 'docs-macros.twig' as mydocs %}
{{ mydocs.samesection( posts ) }}
Again save the Module as a GLOBAL module, so that you can add it to multiple articles. Because it reads the term from the article post it will be placed on, it won’t be necessary for you to change the settings on the module. And because you can change the Twig Template, you are still able to control the way it looks.
The Complete Twig Template (“Docs macros”)
Here’s the complete Twig Template’s content:
{% macro breadcrumbs( post ) %}
{% set ancestors = function('get_post_ancestors', post.ID ) %}
{% set ancpermalink = function('get_permalink' , ancestors|first) %}
{% set seperator = ' ' %}
{% for item in ancestors %}
{{function('get_the_title', item )}}{{seperator}}
{% endfor %}
{% for term in post.terms %}{{term.taxonomy == 'section'?term.name}}{% endfor%}{{seperator}}
{{post.title}}
{% endmacro %}
{% macro pluginsections( posts , wrapincode ) %}
{% for item in posts %}
-
{{wrapincode?"
"}}{{item.title}}{{wrapincode?""}}
{% if date(item.modified_date) > date('-2days') and somemadeupvalue %}
updated
{% endif %}
{% endfor %}
{% endmacro %}
{% macro samesection( posts ) %}
In this section:
{% for item in posts %}
{% if item.ID == post.ID %}
- {{item.title}}
{% else %}
- {{item.title}}
{% endif %}
{% endfor %}
{% endmacro %}
Adding more rows for the index page
The official docs page for Toolbox consists of multiple sections. I’ve decided to duplicate the listing module and change the section it pulls the posts from. This way I can adjust where I want to display each module.
One of the modules has a minor tweak. If you’ve read the complete article, you may remember there was a second parameter for for the pluginsections() macro, called wrapincode.
This parameter, when provided and set to true, will insert tags around the title, so that I can point out that it is actually a filter or action that the viewer is reading. Therefor the template for the “Toolbox Filters” section is somewhat different:
{% import 'docs-macros.twig' as mydocs %}
{{ mydocs.pluginsections( posts , true ) }}
As you can see, we only need to pass in the parameter to make it look a little different.
Wrapping things up
Of course, one single article is not enough but this is all the code and template you will need to display entire structures. I saved a Beaver Builder Template once I was satisfied with the way it looked. This way I’m able to add a new Docs Article with the desired Content term and Category term, open in Beaver Builder, apply a template and then just write the article. It will automatically appear in the sections when saved.